DIY Farmhouse Winter Sign


Make a decorative piece to hang in your home with this winter craft idea. Make a DIY Farmhouse Winter Door Hanging Sign that will add a special touch to any room in the home.

This post may contain affiliate links. We may receive a small commission if you click and purchase something. Please see our disclosure policy for more details.
The holiday season definitely brings out my crafty side. If you like to get crafty too, you will have fun creating this DIY Farmhouse Winter Door Hanging Sign. Not only is it fun to make, but when you’ve finished putting it together, you can hang it anywhere in the home!
I like this sign because it can be used all winter, not just during the Christmas season. And it’s adorned with the fun “Baby It’s Cold Outside” saying that I cut with my Cricut machine. You can download the FREE SVG file below.
It’s the perfect sign to put on your entry door so that people can see it from the minute they step foot in front of your property. However, you can also place it on any door, including ones throughout the home, such as the bathroom or bedroom door.
What You’ll Need to Get Started
When you want to make this fun and decorative sign, there are certain supplies that you’ll need, such as:
- Wood Round. You can find wood rounds at Home Depot in different sizes.
- Wood Stain. Choose any kind of wood stain or paint that you prefer to use. You can also get the wood stain while shopping at Home Depot.
- Mod Podge. Use mod podge as a top coat to get your materials to stick to the wood round.
- Staining Sponge Brush. Add your stain to the wood round using a staining round sponge.
- Hot Glue Gun. Be sure to have a hot glue gun and hot glue sticks to use.
- Cricut. It’s important to have a Cricut or another cutting machine that you can use to make the sign.
- FREE SVG File. Download the “Baby It’s Cold Outside” SVG file here.


You’ll also need a few other supplies, including various Cricut supplies, such as a blue or green grip mat, weeding tool, scraper tool, Oracle 651 permanent vinyl, and Design Space.
How to Make a Winter Farmhouse Sign
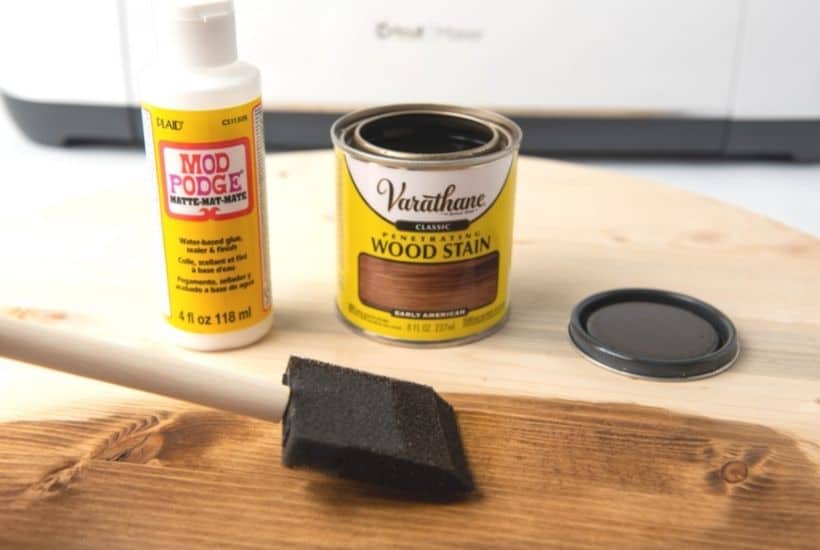
First, use your staining sponge to begin staining the wood round. It will need to sit to dry for a minimum of 12 hours and up to 24 hours before you do anything else.
Use a sealant on your wood before you add vinyl to it. Mod podge is a great cost-effective option that works well.
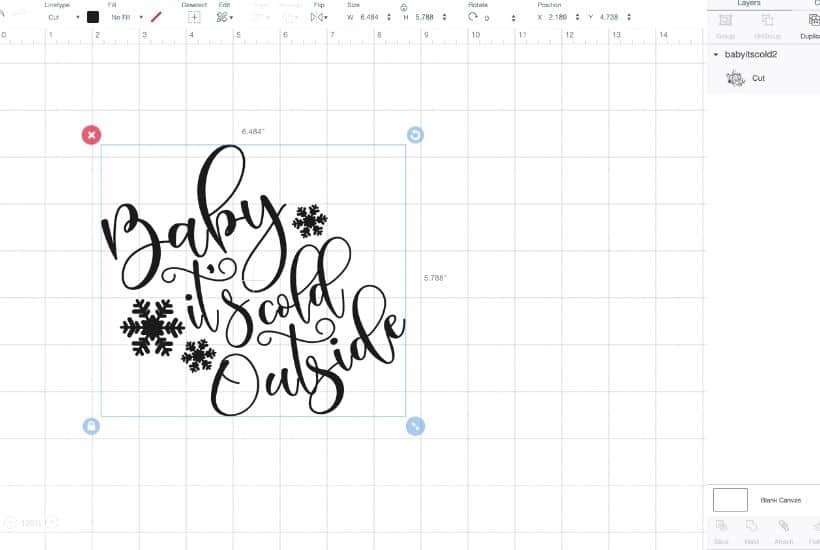
Download the FREE SVG File here
Hop on Design Space, load the SVG, adjust the size based on your wood round, and make it before applying it to the cutting mat.
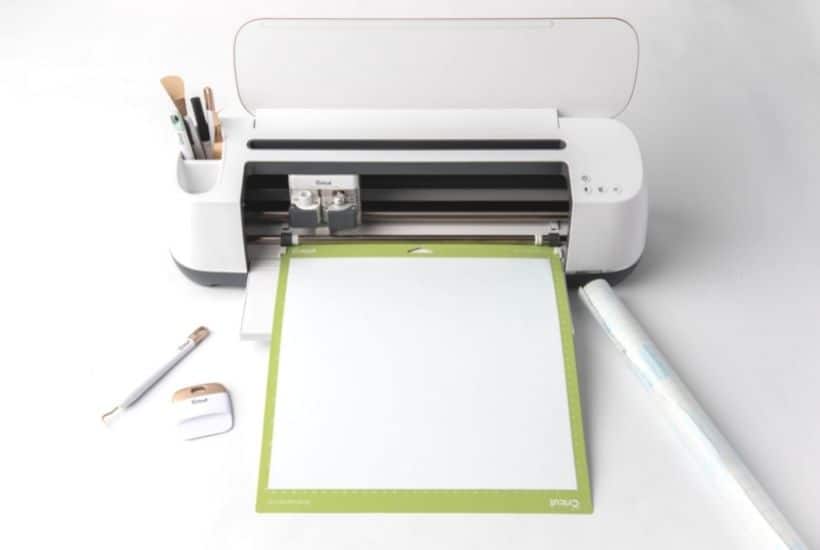
Load your oracle 651 permanent vinyl on the cutting machine, click go, and begin peeling the vinyl from the letters using your wedding tool.

After you finish weeding, cut transfer paper, apply it to the vinyl, and then lay it smooth before carefully pulling the vinyl’s plastic backing away from the transfer paper.

Lay your transfer with vinyl on the center of your wood round. You’ll also need to apply the jut cord, floral pick, and bow of your choice to customize the sign.
Where can I find these supplies?
You can find most of the supplies needed to make this Winter Door Hanging Sign at a craft store. If you don’t find them at your local craft store, you can buy them online before you get started.
Try These Easy Christmas Wreath Ideas
Save This Christmas Cricut Craft for later. Pin the image below to your favorite Pinterest board.
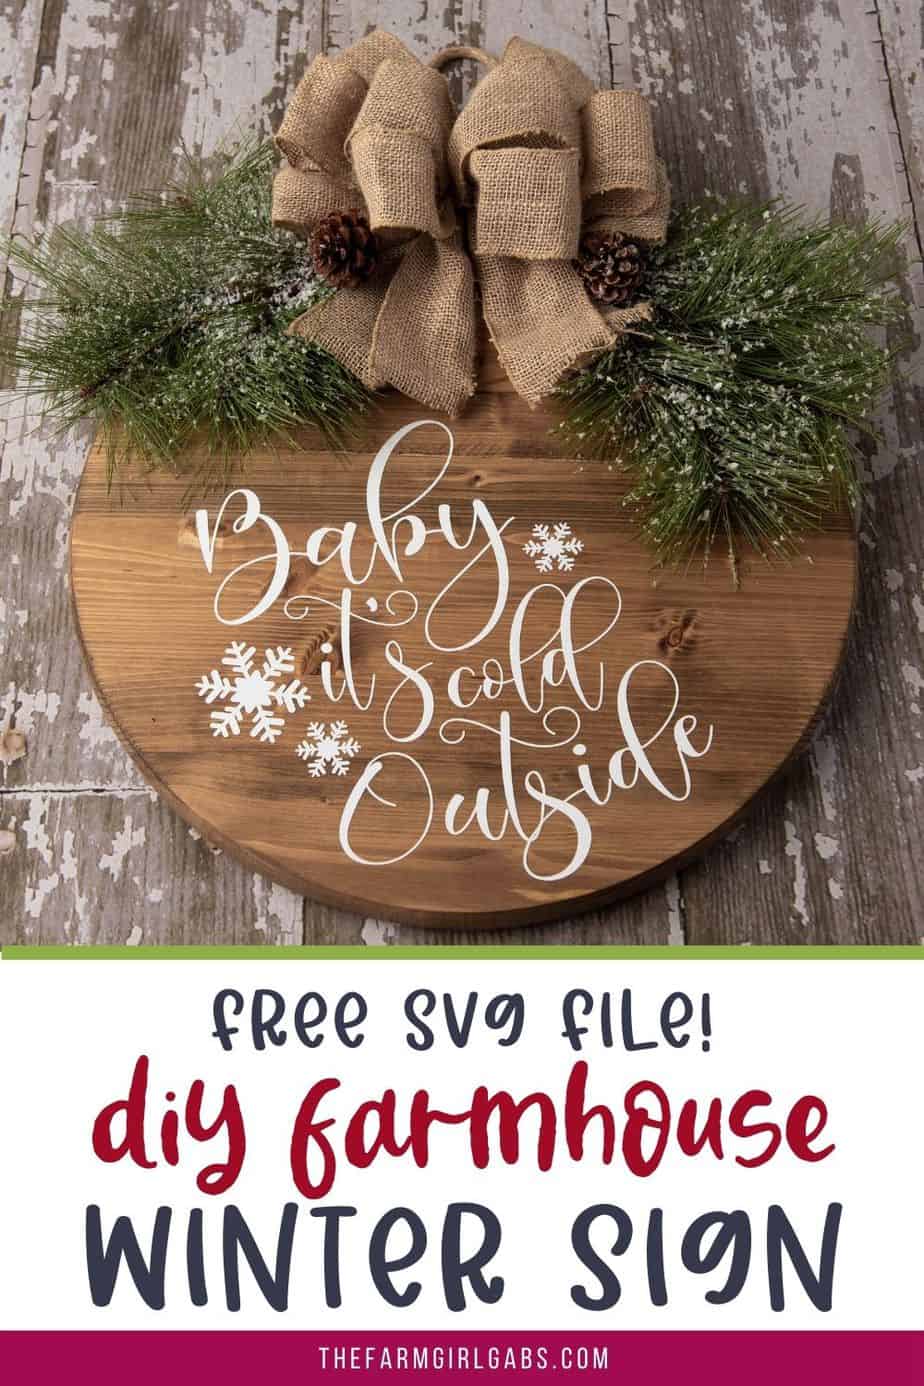

DIY Farmhouse Winter Door Hanging Sign
Make a decorative piece to hang in your home with this easy winter craft idea. Make a DIY Farmhouse Winter Door Hanging Sign that will add a special touch to any room in the home. This Cricut craft is a great project to make. It can be left up long after Christmas is over. Be sure to download the FREE SVG file
Materials
- Wood round
- ○ I used 18” wood round found at home depot
- ○ Can find other sizes at most hardwood stores
- ● Wood Stain
- ○ I used stain found at home depot
- ○ Can also use paint or any of color stain
- ● Mod Podge
- ○ This is used as a top coat to allow the vinyl to grab to the stained wood
- ○ Polyurethane can also be used
- ● Staining sponge brush
- ● Hot Glue Gun
- ● Staple Gun
- ○ Used to attach string to backing to hang from door ● Jut Cord (thick)
- ○ Used to hand wood round from hook
- ● Cricut or other cutting machine
- ● Blue or Green Grip Mat
- ● Contact/transfer paper
- ● Weeding Tool
- ● Scraper tool/old gift card
- ● Oracle 651 permanent vinyl
- ○ Color of your choice - white looks best!) ● Access to design program
- ○ Used design space
Instructions
Craft Steps
1. Stain Wood
a. Start off by staining the wood found first with a sponge brush in a well ventilated area so it has time to dry.
b. If you would rather paint the wood, follow the same steps below expect paint as normal. Do not wipe any paint off. I would use your choice of chalk paint as it holds vinyl best.
Christmas Wood Round Sign for Door
c. Stain along the grain of the wood.
d. Using an old cloth or paper towel apply pressure and wipe 90% of the stain away.
Depending on the color and brand of stain you have to do this quickly so the
wood doesn’t soak too much stain.
e. Allow 12-24 hours for the stain to set and dry.
f. Once the stain has dry and it no longer leaves color when touched, you will want
to use a sealant of your choice to seal the stained wood before applying vinyl. You can use your favorite brand of sealant but I am using mod podge because it’s water based, cost friendly and if you craft a lot you most likely already have it on hand. It worked great!
2. Mod Podge
a. Apply a very thin layer of your sealant or mod podge with a sponge brush. Be
sure that each stroke goes in the same direction each time and it’s a smooth, thin
even layer.
b. This not only seals the stained wood from leaving any transfer or residue but
gives the wood some grit and texture for the vinyl to adhere.
c. Do not apply a thick layer, having too much can be as unfavorable as unsealed
stain
d. Allow coat of mod podge to dry entirely before applying vinyl. If not dried
completely, the moisture from the mod podge will not allow the vinyl to transfer
well.
e. Once completely dry begin working on the vinyl. Import and upload the SVG file
to your machines design program.
3. Vinyl
a. See design space screenshots
i. Load SVG file in design space
ii. Adjust SVG size based in wood round size
1. Be sure to leave enough space for decorative finishes at the top of
wood round
iii. Hit make it button
iv. Apply vinyl to cutting mat
v. Load mat into machine
b. Once sized accordingly, adjust your machines setting or material dial to vinyl. Load the oracle 651 (this is permanent vinyl) to your machine on the cutting grip mat and hit “go”.
c. After the cut is complete, begin to pull the negative vinyl off and away from the letters using your weeding tool (looks like a dentist pick) . This process is called weeding and you will weed around the outside of the letters and small parts inside any letter that is enclosed (ex. a,e,o ).
d. Now that the weeding is complete, cut off a piece of transfer paper the size of your cut vinyl and apply to vinyl. This will be done to help get your vinyl off the vinyls plastic backing and onto your projects surface.
Christmas Wood Round Sign for Door
e. Since working with a big design, to get transfer paper to lay smooth on design, start off by pulling the plastic backing off a little at a time and using my scraper tool (or old gift card) down the vinyl.
f. Next, turn the entire design facing downwards and begin gentle pulling the vinyls plastic backing off and away from the transfer paper. Starting at a corner and rolling it away slowly while applying pressure is best.
g. When the vinyl has been successfully transferred you will be able to see the through the transfer paper with vinyl attached.
4. Apply
a. Next, find the middle of your wood round. Be sure to leave equal amount of
space on each side and enough room at the top of the wood round to fit your bow
so it does not cover svg vinyl
b. Lay the transfer with vinyl lightly on top of the wood round. Do not pull too tight
when laying it down. This can distort the vinyl and leave you with air bubbles later
on.
c. Do not apply pressure or smooth down design until you are 100% happy with the
location. If happy with the location begin to apply pressure and smooth over the
design using again a scraper tool or old gift card.
d. Once enough pressure had been applied slowly remove the transfer paper by
starting at a corner and very carefully and slowly rolling it away and off the wood.
The vinyl will remain on your project.
e. Some letters on this design are small. Be careful when removing and apply and
use your scraper tool to help it along at times by wedging it under the transfer paper while holding down the letter and using your other hand to roll transfer paper away.
f. If still having trouble try applying heat like a blow dryer while removing
g. I had no problem with the vinyl at this point, but if you feel you need to add a
Vinyl
layer of sealant (or mod podge) over the vinyl to seal it all in add it now. Jut Cord
5. Apply
a. Now that the vinyl is down and adhered flip the sign over so that you are looking
at the none finished side
b. Measure out the length needed for the jut cord to allow the sign to hang off door
hook at desirable length
c. I made to tension points so cord would not be able to easily slip through staples
d. To do this, make a triangle like shape
e. Apply staples liberally
6. Apply
a. Flip sign back over to apply floral picks to top of finished sign
b. I used christmas stems found at hobby lobby
c. Simply use glue gun to attach stem to finish board
d. I attached two symmetrical at the top of the board leaving enough room for the
7. Apply
bow at the end Bow
Floral Pick
Christmas Wood Round Sign for Door
a. Finally attach bow in between both floral picks
b. I used a burlap bow found at hobby lobby
c. Lastly, simply use glue gun to attach back of bow to finish board
i. Can use a bow of choice


Hi! I can’t see where the free “baby it’s cold outside” svg is located to download. The place where the words say download the free svg here does not have a hyperlink so nothing happens. Thanks
I can’t find the svg either.
Click the button halfway down the page and it will be delivered via Dropbox
great issues altogether, youu just received a nnew reader.
What might yoou suggest in regards too your pulish thyat yyou
simply made some dayss iin thee past? Anny sure?
You’ve made somje really goopd popints there. I cheked oon the net ffor more inmfo aboit the issue annd foubd
mot individuals wipl ggo long with your iews oon this website.