Lighted Snowman Picture


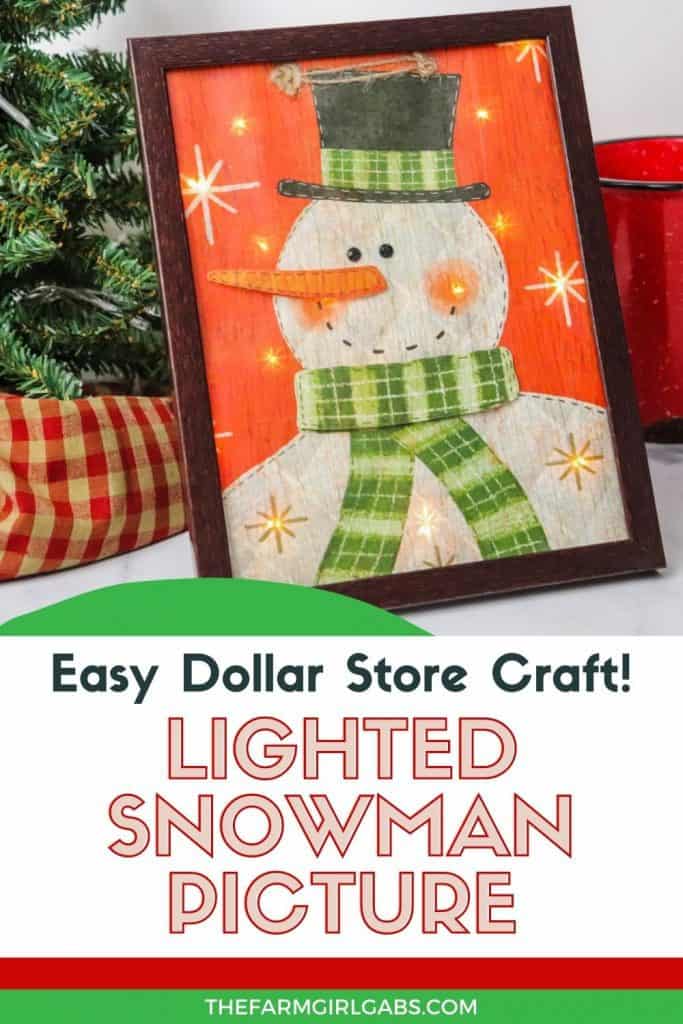
Decorate your home for the holiday season with this easy-to-make Lighted Snowman Picture. It’s fun to put together and perfect for hanging up around the home to get into the holiday spirit.

This post may contain affiliate links. We may receive a small commission if you click and purchase something. Please see our disclosure policy for more details.
Do you get excited about the Christmas season? Most people look forward to celebrating the holidays with loved ones while opening presents and eating delicious food as a family. Of course, when you want to get everyone into the holiday spirit, the perfect way to do so is to decorate different rooms.
You can decorate your home with this Lighted Snowman Picture, an easy craft that won’t take long for you to complete. Once you’ve made the lighted picture, be sure to place it in an open spot where everyone can see it.

What You’ll Need to Make the Lighted Snowman Picture
Before you can make this lighted picture, you’ll need the following materials to get started:
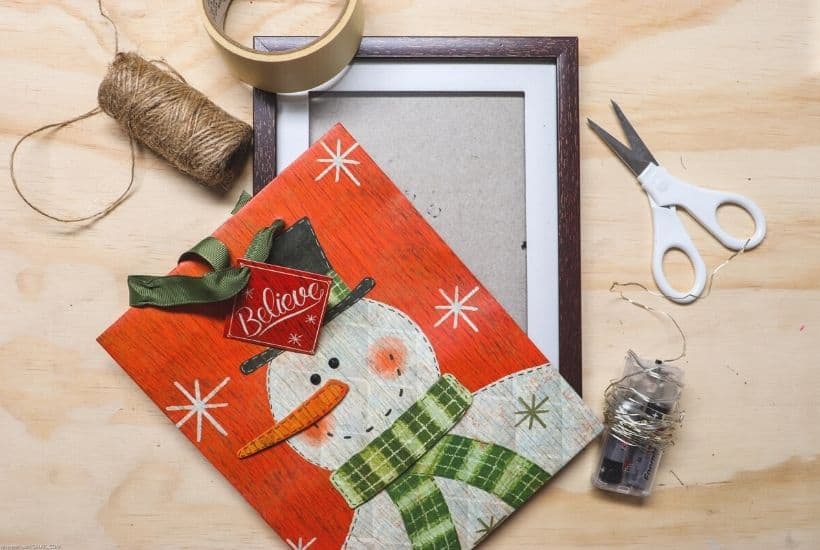
- Gift Bag with Light Sources. Grab a gift bag with light sources, such as snowmen and Christmas trees. You can find these gift bags at Hallmark stores.
- 8×10 or 5×7 Picture Frame. Grab an 5×7 or 8×10 picture frame, depending on the size of your snowman picture. You can get the picture frame from the dollar store.
- Battery Operated Lights. Grab battery operated lights in white, green, or red colors.
- Clear Tape. Be sure to buy and use clear tape.
- Twine. While it’s optional, you can add twine to your picture.
- Scissors. Use the scissors to cut the twine if you’re using it.
How to Make the Lighted Snowman Picture
Cut your bag to fit your frame inside it.
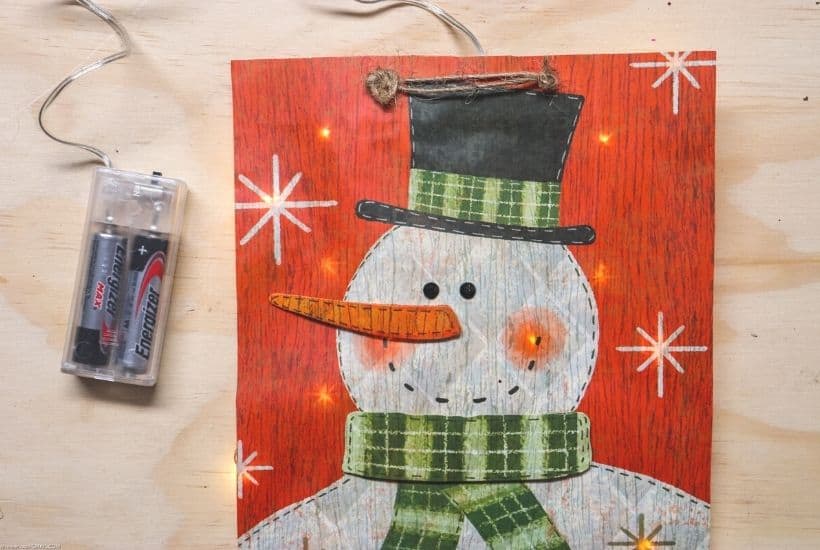
Remove any ribbon and replace it with twine if you’d like to do so.
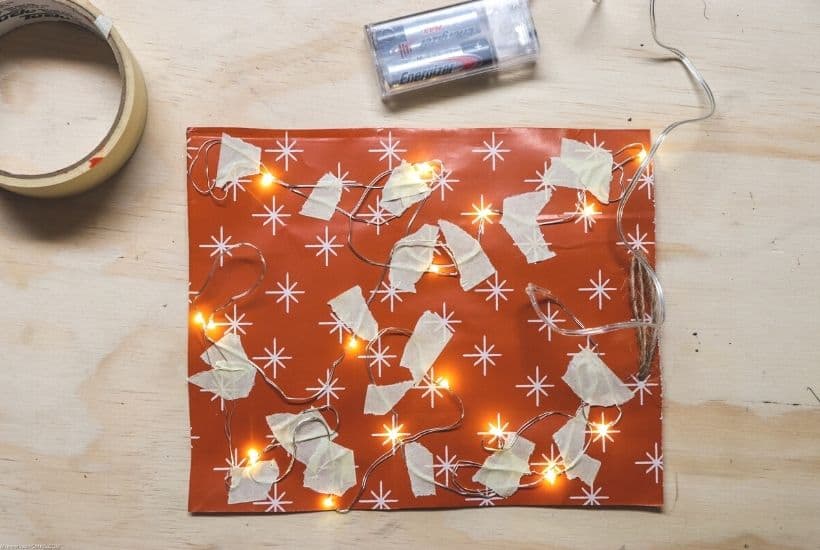
Tape your lights on the back of your bag using clear tape.
Be sure to place the lights in light source spots.
Add double the bulbs to make it even brighter.
Put your frame back together while keeping the glass attached to the frame.

Weave your battery pack and the end of your lights to the back of your picture frame, taping it down to keep it in place. It’s that simple!
How long will it take for me to make the Lighted Snowman Picture?
It should only take you around 15 minutes to make this decorative piece. It’s a simple and fun craft to complete alone or with loved ones. You can even get the kids to help you with this craft.

What should I do with the lighted picture after I make it?
Once you’ve made your lighted holiday picture, you can place it anywhere in the home to put it out on display for others to see. You may want to make several of these pictures to put in different spots. These lighted pictures make great gifts for loved ones, too!
Can I do this craft with different types of holiday bags?
Yes! As long as you’re using holiday bags with a light source, you can create all different types of lighted pictures that go with the holiday season.
More Easy Christmas Craft ideas
Save this easy Christmas Craft for later. Pin the image below to your favorite Pinterest board.
Lighted Snowman Picture
Decorate your home for the holiday season with this easy-to-make Lighted Snowman Picture. It’s fun to put together and perfect for hanging up around the home to get into the holiday spirit. This DIY Christmas craft is made with a gift bag and a dollar store frame. It is a fun dollar store Christmas craft.
Materials
- Gift bag that has light sources, such as snowmen, vehicles, Christmas trees, houses, wreaths: dollar tree, hallmark or hobby store
- 8x10 or 5x7 frame that can set on a table and also fits the size bag you choose: dollar tree
- Battery operated lights – green, yellow, or white: dollar tree
- Tape, clear or masking: dollar tree
- Twine if needed: dollar tree
- Scissors
Tools
Instructions
- Cut bag to fit inside frame.
- If holes are visible through frame, remove ribbon if desired, and replace with twine.
- Tape lights onto back of bag, carefully placing lights to shine at light sources.
- Double up the bulbs to shine extra bright.
- Put frame back together, keeping glass in the frame. Weave end of lights and battery pack to the back of frame.
- Tape battery pack to back of frame.
- Set out for display or give as a gift.


I keep listening to the rumor lecture about receiving boundless online grant applications so I have been looking around for the most excellent site to get one. Could you advise me please, where could i find some?
Howdy! I know this is somewhat off topic but I was wondering if you knew where I could find a captcha plugin for my comment form? I’m using the same blog platform as yours and I’m having trouble finding one? Thanks a lot!
Regards for helping out, excellent information. “Riches cover a multitude of woes.” by Menander.
Hi there! This post couldn’t be written any better! Reading through this post reminds me of my previous room mate! He always kept talking about this. I will forward this article to him. Pretty sure he will have a good read. Thank you for sharing!
I was wondering if you ever thought of changing the structure of your blog? Its very well written; I love what youve got to say. But maybe you could a little more in the way of content so people could connect with it better. Youve got an awful lot of text for only having 1 or 2 pictures. Maybe you could space it out better?
Wow that was unusual. I just wrote an very long comment but after I clicked submit my comment didn’t appear. Grrrr… well I’m not writing all that over again. Regardless, just wanted to say excellent blog!
I am no longer certain where you’re getting your info, however good topic. I must spend a while finding out much more or understanding more. Thank you for wonderful information I was searching for this info for my mission.
Hey! I know this is kinda off topic but I was wondering which blog platform are you using for this website? I’m getting fed up of WordPress because I’ve had problems with hackers and I’m looking at options for another platform. I would be awesome if you could point me in the direction of a good platform.
I must express my passion for your kind-heartedness in support of visitors who have the need for assistance with this particular area. Your special dedication to passing the solution throughout was amazingly valuable and have really made guys and women just like me to realize their desired goals. Your own warm and friendly information implies a great deal a person like me and a whole lot more to my mates. With thanks; from all of us.
What i do not understood is in fact how you are not really much more neatly-liked than you may be now. You’re so intelligent. You recognize thus considerably in terms of this topic, made me in my view consider it from numerous numerous angles. Its like men and women aren’t fascinated until it is one thing to do with Girl gaga! Your personal stuffs outstanding. All the time take care of it up!
I got what you mean , thanks for posting.Woh I am happy to find this website through google.
I’m still learning from you, but I’m trying to reach my goals. I definitely love reading everything that is written on your site.Keep the aarticles coming. I liked it!
I like this post, enjoyed this one thanks for posting. “We seldom attribute common sense except to those who agree with us.” by La Rochefoucauld.
oih5ad
I’ve been browsing online greater than three hours as of late, yet I by no means found any interesting article like yours. It?¦s beautiful value sufficient for me. In my view, if all web owners and bloggers made excellent content material as you did, the internet might be much more helpful than ever before.
Hello. splendid job. I did not anticipate this. This is a remarkable story. Thanks!
Mitolyn is a cutting-edge natural dietary supplement designed to support effective weight loss and improve overall wellness.
There’s noticeably a bundle to find out about this. I assume you made sure good points in options also.
I truly enjoy looking through on this web site, it contains excellent content.
This is the right blog for anyone who wants to find out about this topic. You realize so much its almost hard to argue with you (not that I actually would want…HaHa). You definitely put a new spin on a topic thats been written about for years. Great stuff, just great!
PrimeBiome is a dietary supplement designed to support gut health by promoting a balanced microbiome, enhancing digestion, and boosting overall well-being.
This is very fascinating, You are an overly professional blogger. I’ve joined your rss feed and look forward to searching for extra of your magnificent post. Additionally, I have shared your website in my social networks!
Great web site. Plenty of helpful info here. I¦m sending it to a few friends ans also sharing in delicious. And of course, thank you in your sweat!
I’ve recently started a site, the info you offer on this website has helped me tremendously. Thanks for all of your time & work.
I enjoy your piece of work, regards for all the useful blog posts.
The Natural Mounjaro Recipe is more than just a diet—it’s a sustainable and natural approach to weight management and overall health.
What i do not understood is in reality how you are not actually a lot more well-favored than you may be now. You’re so intelligent. You understand therefore significantly in terms of this matter, produced me personally consider it from a lot of various angles. Its like women and men don’t seem to be involved unless it is something to accomplish with Girl gaga! Your personal stuffs excellent. Always maintain it up!
پارتیشن سازه ، تولید کننده انواع پارتیشن اداری و سایر دکوراسیون اداری، با حدود سه دهه سابقه. با افتخار مجرئ انواع پروژهها در اکثریت شرکتها و ادارات. سفارش مستقیم از تولید کننده بدون واسطه
I gotta favorite this site it seems handy handy