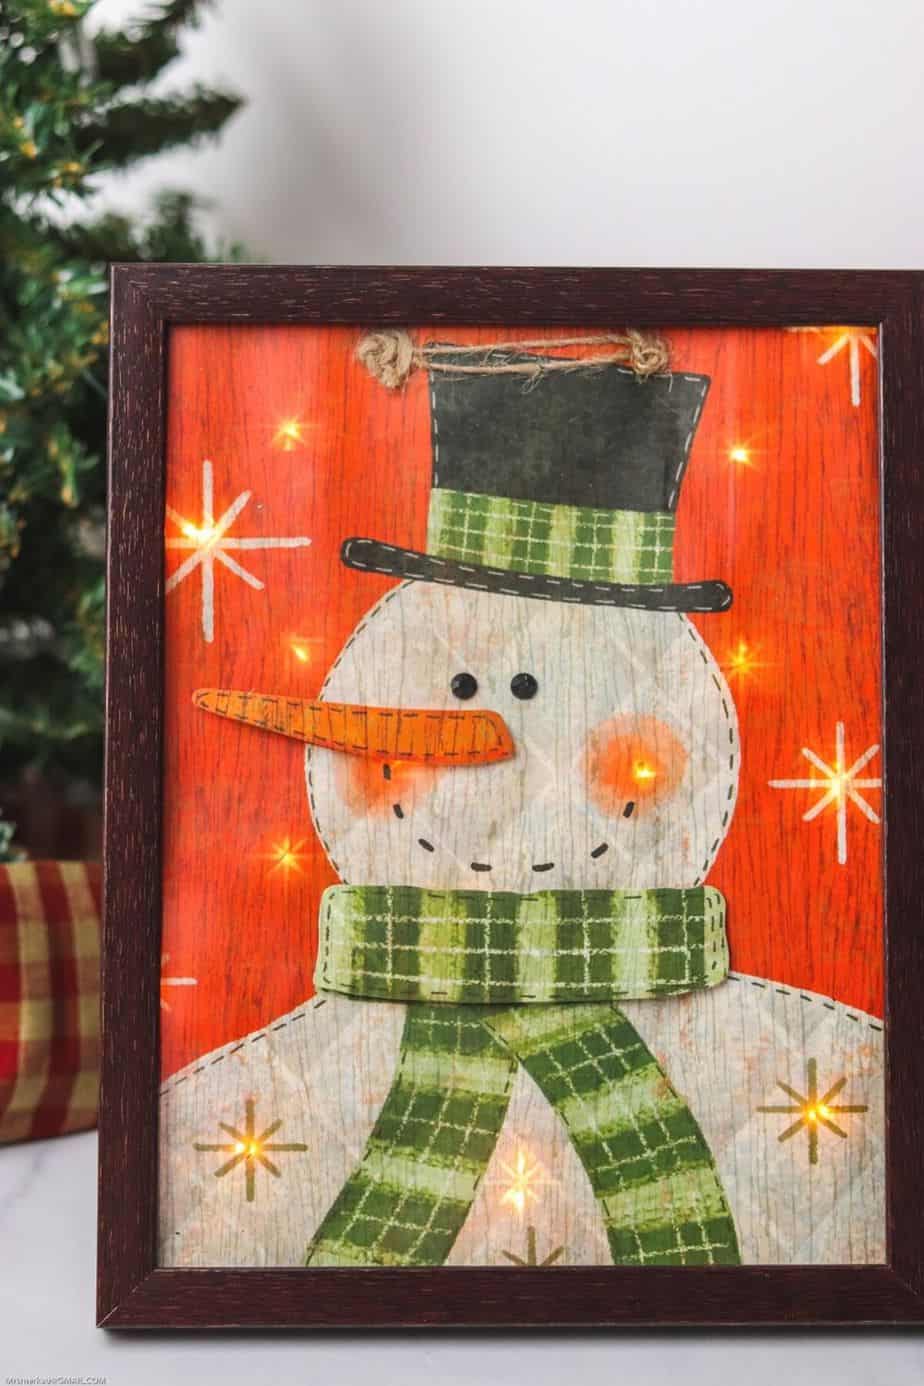
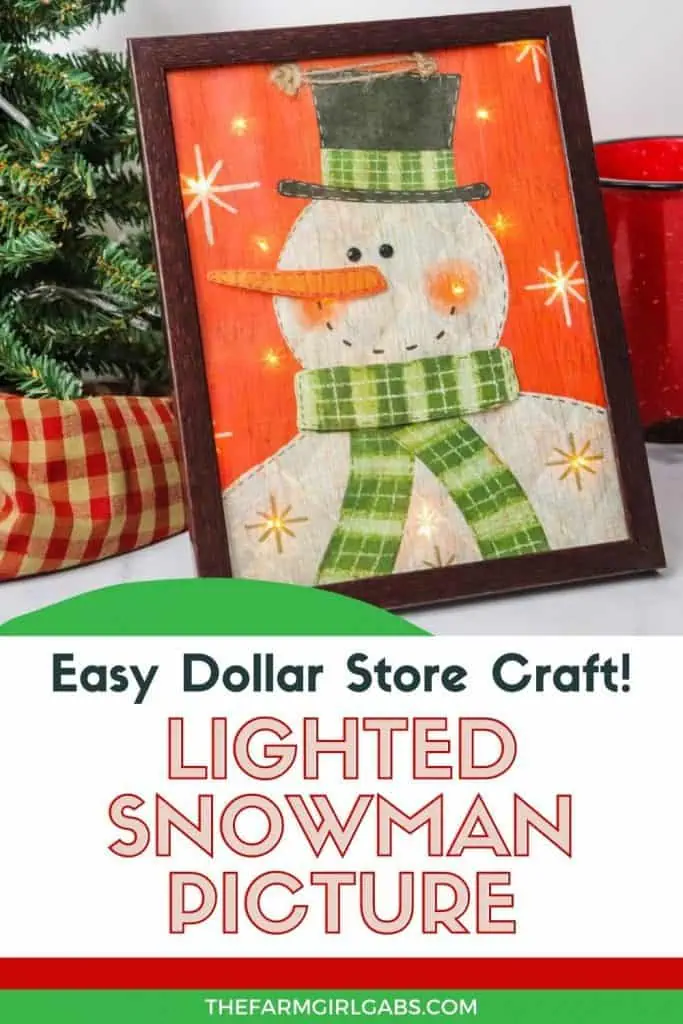
Lighted Snowman Picture


Decorate your home for the holiday season with this easy-to-make Lighted Snowman Picture. It’s fun to put together and perfect for hanging up around the home to get into the holiday spirit.
This post may contain affiliate links. We may receive a small commission if you click and purchase something. Please see our disclosure policy for more details.
Do you get excited about the Christmas season? Most people look forward to celebrating the holidays with loved ones while opening presents and eating delicious food as a family. Of course, when you want to get everyone into the holiday spirit, the perfect way to do so is to decorate different rooms.
You can decorate your home with this Lighted Snowman Picture, an easy craft that won’t take long for you to complete. Once you’ve made the lighted picture, be sure to place it in an open spot where everyone can see it.
What You’ll Need to Make the Lighted Snowman Picture
Before you can make this lighted picture, you’ll need the following materials to get started:
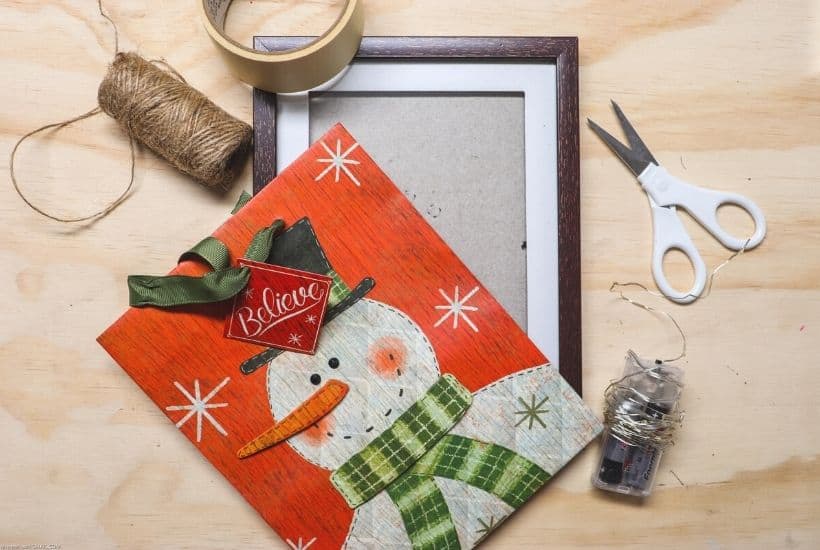
- Gift Bag with Light Sources. Grab a gift bag with light sources, such as snowmen and Christmas trees. You can find these gift bags at Hallmark stores.
- 8×10 or 5×7 Picture Frame. Grab an 5×7 or 8×10 picture frame, depending on the size of your snowman picture. You can get the picture frame from the dollar store.
- Battery Operated Lights. Grab battery operated lights in white, green, or red colors.
- Clear Tape. Be sure to buy and use clear tape.
- Twine. While it’s optional, you can add twine to your picture.
- Scissors. Use the scissors to cut the twine if you’re using it.
How to Make the Lighted Snowman Picture
Cut your bag to fit your frame inside it.
Remove any ribbon and replace it with twine if you’d like to do so.
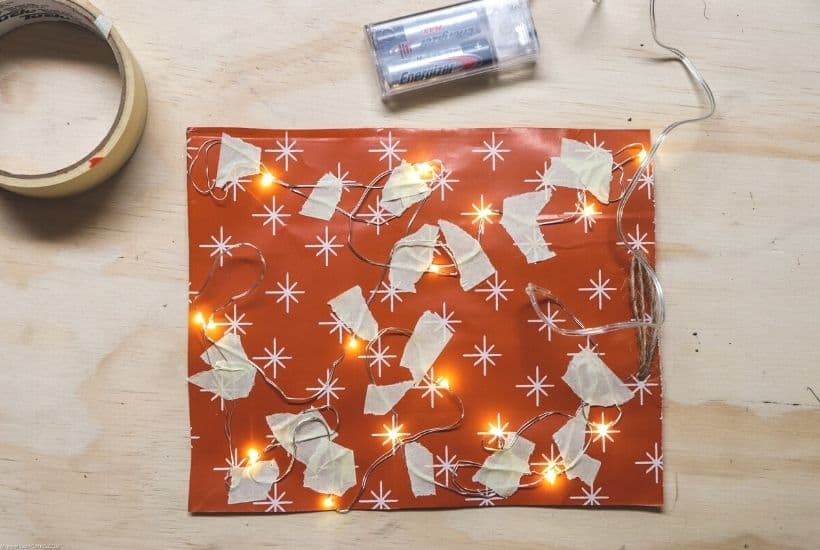
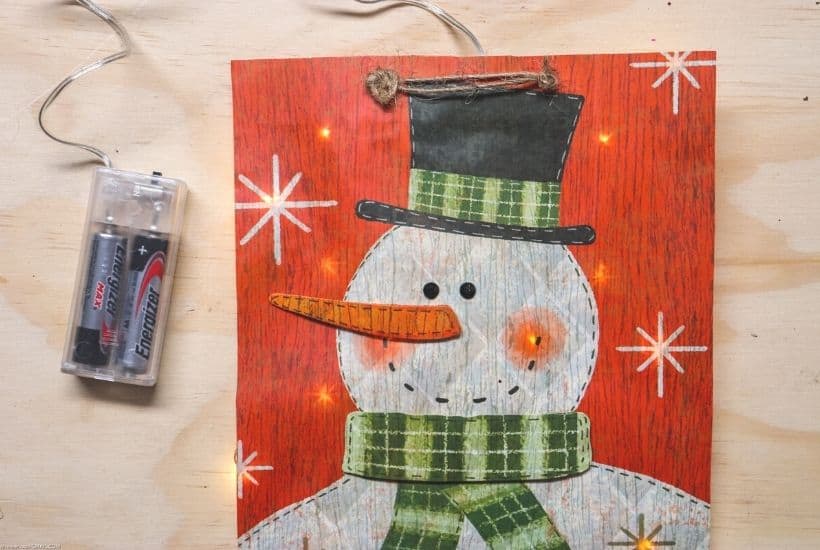
Tape your lights on the back of your bag using clear tape.
Be sure to place the lights in light source spots.
Add double the bulbs to make it even brighter.
Put your frame back together while keeping the glass attached to the frame.
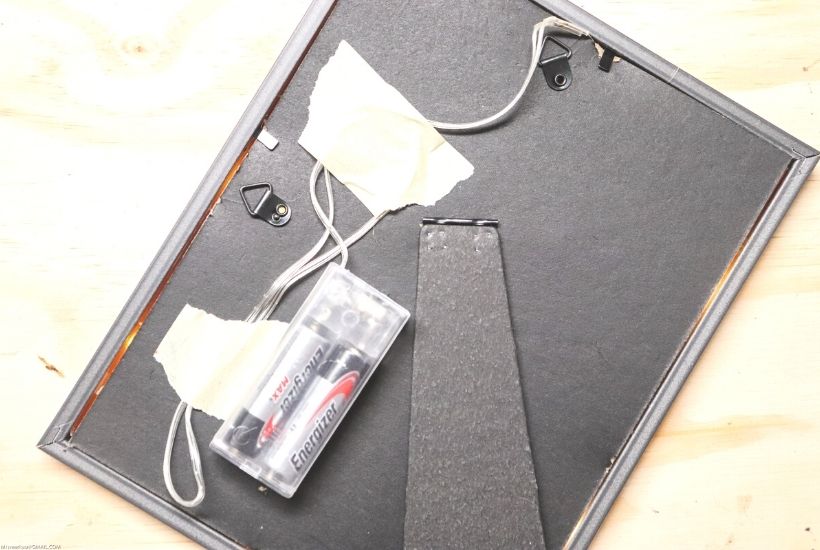
Weave your battery pack and the end of your lights to the back of your picture frame, taping it down to keep it in place. It’s that simple!
How long will it take for me to make the Lighted Snowman Picture?
It should only take you around 15 minutes to make this decorative piece. It’s a simple and fun craft to complete alone or with loved ones. You can even get the kids to help you with this craft.

What should I do with the lighted picture after I make it?
Once you’ve made your lighted holiday picture, you can place it anywhere in the home to put it out on display for others to see. You may want to make several of these pictures to put in different spots. These lighted pictures make great gifts for loved ones, too!
Can I do this craft with different types of holiday bags?
Yes! As long as you’re using holiday bags with a light source, you can create all different types of lighted pictures that go with the holiday season.
More Easy Christmas Craft ideas
Save this easy Christmas Craft for later. Pin the image below to your favorite Pinterest board.

Lighted Snowman Picture
Decorate your home for the holiday season with this easy-to-make Lighted Snowman Picture. It’s fun to put together and perfect for hanging up around the home to get into the holiday spirit. This DIY Christmas craft is made with a gift bag and a dollar store frame. It is a fun dollar store Christmas craft.
Materials
- Gift bag that has light sources, such as snowmen, vehicles, Christmas trees, houses, wreaths: dollar tree, hallmark or hobby store
- 8x10 or 5x7 frame that can set on a table and also fits the size bag you choose: dollar tree
- Battery operated lights – green, yellow, or white: dollar tree
- Tape, clear or masking: dollar tree
- Twine if needed: dollar tree
- Scissors
Tools
Instructions
- Cut bag to fit inside frame.
- If holes are visible through frame, remove ribbon if desired, and replace with twine.
- Tape lights onto back of bag, carefully placing lights to shine at light sources.
- Double up the bulbs to shine extra bright.
- Put frame back together, keeping glass in the frame. Weave end of lights and battery pack to the back of frame.
- Tape battery pack to back of frame.
- Set out for display or give as a gift.


![Celebrate Awards Season With These Easy Art Deco Painted Glasses. #AwardWithSavings [Ad]](https://sp-ao.shortpixel.ai/client/to_webp,q_glossy,ret_img,w_680,h_453/https://thefarmgirlgabs.com/wp-content/uploads/2015/12/Art-Deco-Painted-Glasses-Feature-4.jpg)
nwb7sc
Поиск в гугле
This really answered my downside, thanks!
vqvv4j
c5kh4c
2w7plr
awu9n5
I am not certain where you’re getting your info, but great topic. I needs to spend a while learning more or working out more. Thank you for wonderful info I was looking for this info for my mission.
This is a topic close to my heart cheers, where are your contact details though?
You actually make it appear really easy with your presentation however I to find this matter to be actually one thing that I think I might by no means understand. It kind of feels too complicated and extremely large for me. I’m taking a look ahead for your next put up, I will try to get the cling of it!
Some times its a pain in the ass to read what website owners wrote but this site is really user genial! .
Some truly wonderful posts on this site, thank you for contribution. “I finally know what distinguishes man from other beasts financial worries. – Journals” by Jules Renard.
It is best to participate in a contest for the most effective blogs on the web. I will advocate this website!
A formidable share, I simply given this onto a colleague who was doing somewhat analysis on this. And he actually purchased me breakfast as a result of I discovered it for him.. smile. So let me reword that: Thnx for the deal with! But yeah Thnkx for spending the time to discuss this, I really feel strongly about it and love reading extra on this topic. If attainable, as you change into experience, would you thoughts updating your weblog with more particulars? It is extremely useful for me. Huge thumb up for this weblog publish!
I love it when people come together and share opinions, great blog, keep it up.
I went over this web site and I think you have a lot of fantastic info , saved to fav (:.
Its excellent as your other articles : D, regards for posting.
I couldn’t resist commenting
Wow that was strange. I just wrote an extremely long comment but after I clicked submit my comment didn’t appear. Grrrr… well I’m not writing all that over again. Anyway, just wanted to say superb blog!
I do accept as true with all of the ideas you’ve presented in your post. They are very convincing and can definitely work. Nonetheless, the posts are very short for starters. May just you please lengthen them a little from subsequent time? Thanks for the post.
you are actually a good webmaster. The website loading pace is amazing. It seems that you’re doing any unique trick. In addition, The contents are masterpiece. you have performed a wonderful task on this matter!
I like what you guys are up also. Such intelligent work and reporting! Keep up the superb works guys I have incorporated you guys to my blogroll. I think it’ll improve the value of my web site 🙂
F*ckin’ remarkable things here. I am very happy to look your post. Thank you a lot and i am looking forward to contact you. Will you kindly drop me a mail?
I am pleased that I observed this web site, just the right information that I was looking for! .
Great post. I am facing a couple of these problems.
I conceive you have remarked some very interesting points, thanks for the post.
This design is steller! You obviously know how to keep a reader entertained. Between your wit and your videos, I was almost moved to start my own blog (well, almost…HaHa!) Great job. I really loved what you had to say, and more than that, how you presented it. Too cool!
My coder is trying to convince me to move to .net from PHP. I have always disliked the idea because of the expenses. But he’s tryiong none the less. I’ve been using Movable-type on several websites for about a year and am concerned about switching to another platform. I have heard very good things about blogengine.net. Is there a way I can import all my wordpress content into it? Any kind of help would be greatly appreciated!
Thanks for a marvelous posting! I actually enjoyed reading it, you might be a great author.I will remember to bookmark your blog and will come back at some point. I want to encourage you to definitely continue your great work, have a nice holiday weekend!
Great write-up, I am normal visitor of one’s website, maintain up the excellent operate, and It is going to be a regular visitor for a long time.
I don’t commonly comment but I gotta admit regards for the post on this one : D.
I like the helpful info you provide in your articles. I’ll bookmark your weblog and check again here regularly. I’m quite sure I’ll learn lots of new stuff right here! Best of luck for the next!
Aw, this was a really nice post. In idea I would like to put in writing like this additionally – taking time and precise effort to make an excellent article… however what can I say… I procrastinate alot and not at all seem to get something done.
Great post, you have pointed out some superb details , I also believe this s a very great website.
Write more, thats all I have to say. Literally, it seems as though you relied on the video to make your point. You clearly know what youre talking about, why waste your intelligence on just posting videos to your weblog when you could be giving us something enlightening to read?
Attractive portion of content. I simply stumbled upon your website and in accession capital to say that I get actually enjoyed account your weblog posts. Anyway I’ll be subscribing on your feeds or even I achievement you access consistently rapidly.
Absolutely indited articles, appreciate it for entropy. “You can do very little with faith, but you can do nothing without it.” by Samuel Butler.
It¦s in point of fact a great and helpful piece of information. I¦m glad that you just shared this helpful info with us. Please keep us up to date like this. Thanks for sharing.
I think other site proprietors should take this website as an model, very clean and great user genial style and design, as well as the content. You’re an expert in this topic!
Hi my family member! I wish to say that this post is amazing, great written and include almost all important infos. I?¦d like to peer more posts like this .
I take pleasure in, cause I discovered just what I used to be looking for. You’ve ended my 4 day long hunt! God Bless you man. Have a great day. Bye
Very interesting details you have remarked, thanks for posting. “History is a cyclic poem written by Time upon the memories of man.” by Percy Bysshe Shelley.
This design is spectacular! You obviously know how to keep a reader entertained. Between your wit and your videos, I was almost moved to start my own blog (well, almost…HaHa!) Great job. I really loved what you had to say, and more than that, how you presented it. Too cool!
I really enjoy examining on this internet site, it has excellent blog posts. “The great secret of power is never to will to do more than you can accomplish.” by Henrik Ibsen.
I’m still learning from you, while I’m trying to achieve my goals. I absolutely love reading all that is posted on your website.Keep the stories coming. I enjoyed it!
Hi my friend! I want to say that this article is awesome, nice written and include almost all vital infos. I would like to see more posts like this.
c5wl01
Sweet blog! I found it while browsing on Yahoo News. Do you have any tips on how to get listed in Yahoo News? I’ve been trying for a while but I never seem to get there! Many thanks
There is noticeably a bunch to know about this. I consider you made certain good points in features also.
As a Newbie, I am constantly browsing online for articles that can benefit me. Thank you