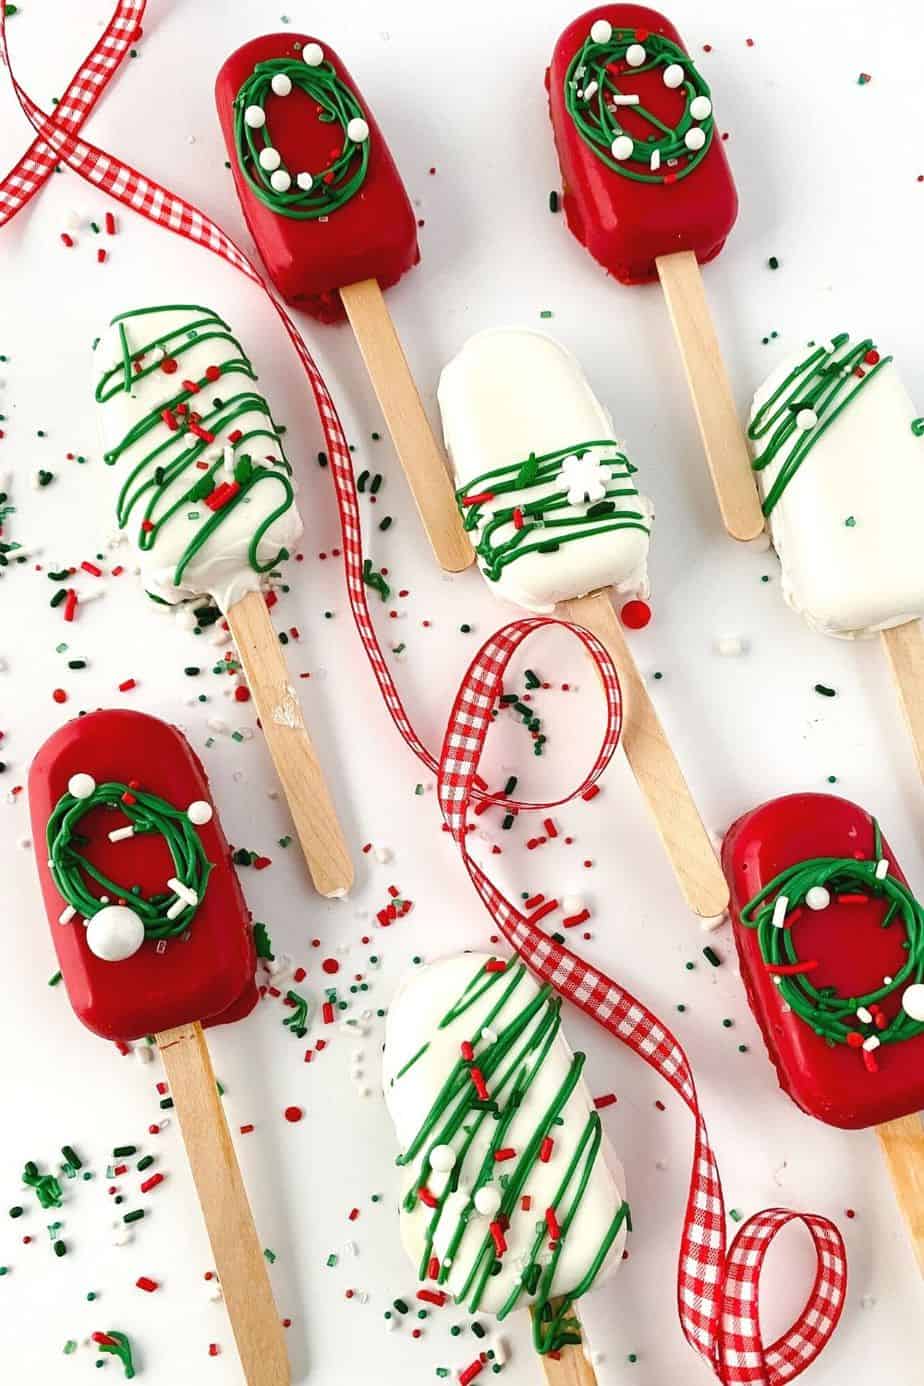
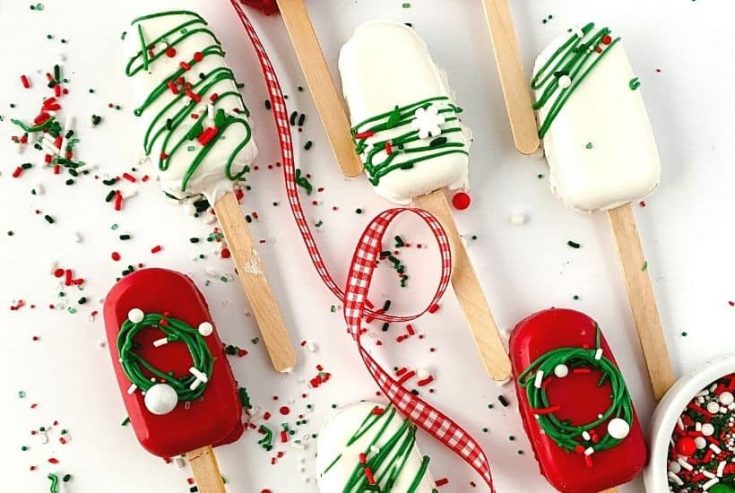
Holly Jolly Christmas Cakesicles


Get in the Christmas spirit with this fun and flavorful Holly Jolly Cakesicle recipe. Not only do these cake pop treats look good and make the perfect treat for guests, but they’re also absolutely delicious!
This post may contain affiliate links. We may receive a small commission if you click and purchase something. Please see our disclosure policy for more details.
If you’re looking forward to the holiday season, one of the things you’re probably feeling most excited about is the different treats you’ll get to prepare in anticipation of Christmas and the New Year. When you’d like to make something sweet and delicious that isn’t a cookie or pie, try this recipe for the Holly Jolly Cakesicle.
Cakesicles are cake pops that are shaped like a popsicle and covered in melted chocolate. Not only do children love these tasty treats, but so do adults! When you want to leave a lasting impression while preparing something fun, tasty, and simple, this is the perfect recipe to choose.

Ingredients You’ll Need for the Holly Jolly Christmas Cakesicle
- Candy Melts – You can use melting candy, Ghirardelli wafers, or almond bark to coat your cakesicle dough.
- Cake Pop Dough – Prepare the cake pop dough with ease and use it as the base for your cakesicles.
- Sprinkles – Select the perfect sprinkles to add to the melted chocolate over your cake pop dough. You can choose holiday-themed options, including red and green sprinkles.
How to Make Holiday Cakesicles
Melt one color of your candy melts and pour the melted mixture into the mold, spreading it up to the sides.
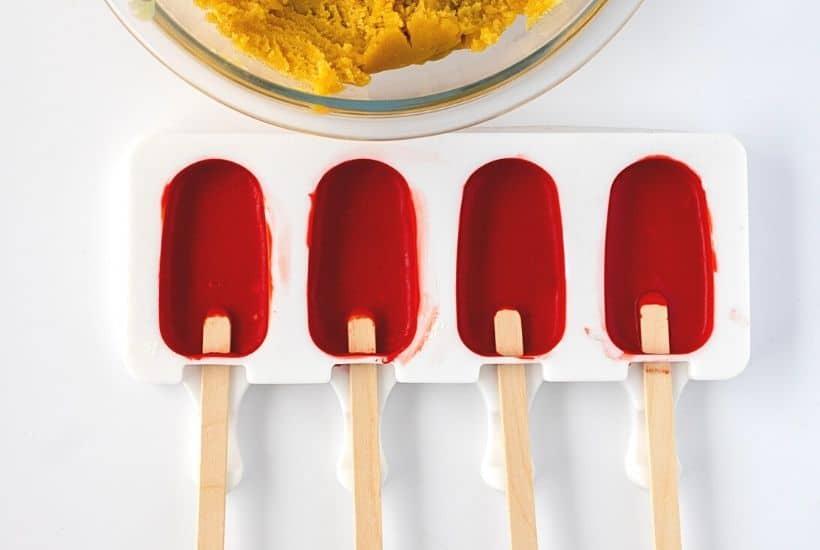
Slide your popsicle sticks into the mold and then place them in the freezer for 15 minutes to let the melted chocolate harden.
Remove from the freezer and use ice cream or cookie dough scoop to add a bit of the cake pop dough (I use this recipe) to each mold.
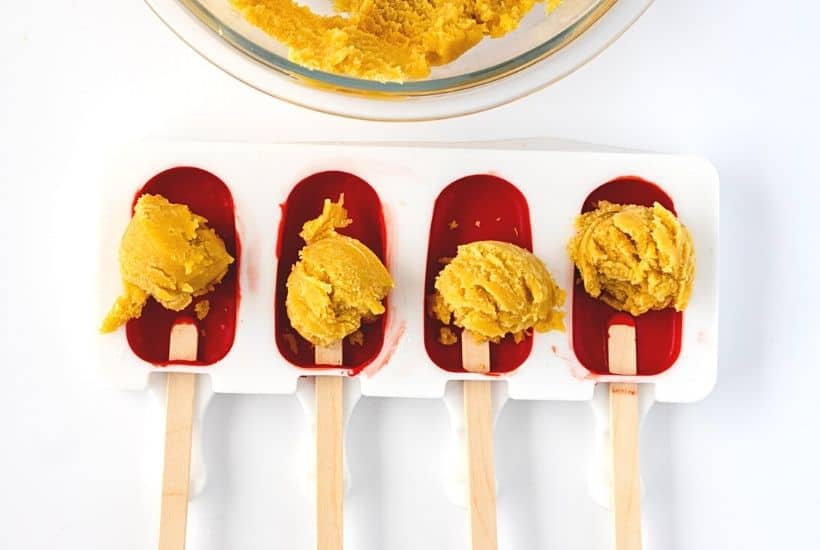
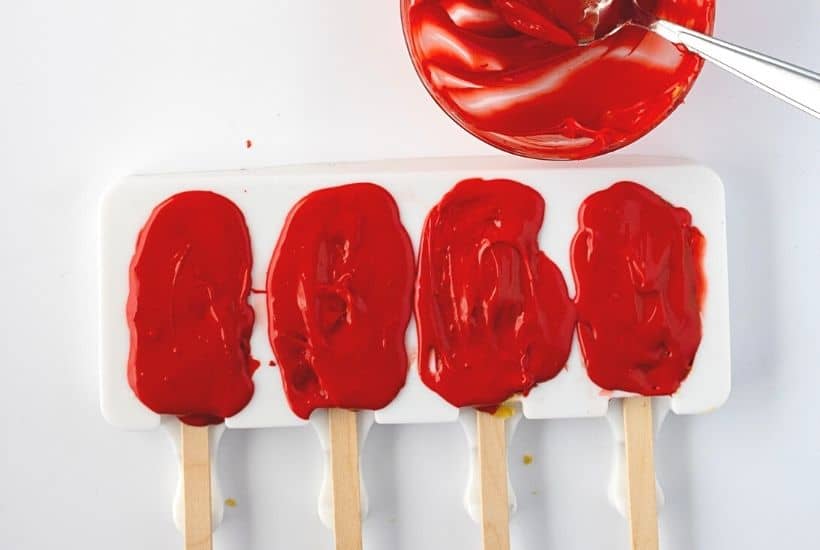
Press the dough gently into the mold and then cover the back with melted chocolate before cleaning up the edges of the mold.
Place in the freezer for an additional five minutes.
Remove the cakesicles from the mold by carefully peeling them from the edges and pushing the popsicle up.
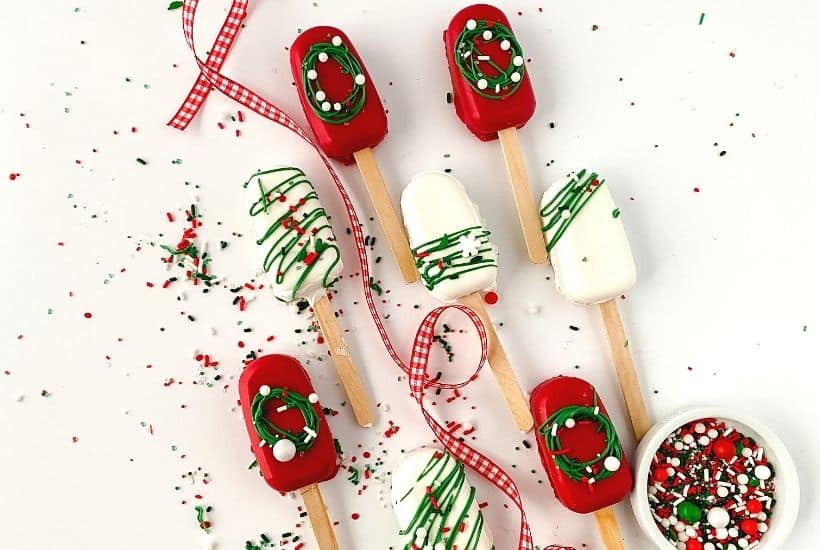
Next, you can melt your chocolate or candy melts in a different color, add the melted chocolate to a piping bag, and decorate your cakesicles. Don’t forget to add some sprinkles on top.
Which flavor should I select for the candy melts?
When you’re preparing the Holly Jolly Cakesciles, it’s a good idea to use white chocolate because then you can decorate the treats with red and green candy melts. If you don’t want to use white chocolate, you can use dark or milk chocolate.
Which cake flavor do I need to use?
It’s fine to use any cake flavor that you prefer. For example, you may want to use chocolate cake or you may prefer using a vanilla cake. Use what you like and prefer to have when biting into these tasty treats.
How to Store the Christmas Cakesicles
After you’ve decorated the Holly Jolly Cakesicles and let them sit for a bit to dry, you can place them in a large food storage container, on a serving tray, or in a dessert box to keep them fresh until you’re ready to serve them.
Kitchen Essentials Needed To Make HomemadenCake Pops
Holly Jolly Cakesicles
Get in the Christmas spirit with this fun and flavorful Holly Jolly Cakesicle recipe. Not only do these cake pop treats look good and make the perfect treat for guests, but they’re also absolutely delicious!6
Ingredients
- 1 cake pop dough recipe
- 1/4 cup colored candy melts, each (white, red & green)
- Popsicle sticks
- Sprinkles
- Vegetable oil, coconut oil, or paramount crystals
Instructions
- Melt the first color of candy coating per package instructions.
- If it’s too thick add in 1 tsp of oil (mixed well) until smooth.
- Pour 1 spoonful of candy coating into the mold. Spread candy up the sides of the mold. If more chocolate is needed to cover the center do so.
- Slide in the popsicle sticks to the center making sure they are as even as possible.
- Freeze for 15 mins (no more no less or you risk cracking the chocolate) When placing in the freezer it needs to be flat and the sticks can not be pointed down inside the chocolate they should hover above it.
- Remove trays from the freezer, using a small cookie scoop portion out the cake pop dough.
- Press gently into the mold careful not to break the chocolate.
- Cover the back with melted chocolate. Clean up the edges as much as possible.
- Freeze for another 5 min so the chocolate is hardened and carefully remove from molds by peeling from the top down.
Notes
- To remove from the mold: Very carefully loosen one of the end pieces. Peeling the mold from the top, very carefully peel the entire pop free. Carefully push the sticks up through the mold.
- Rest on a parchment-lined baking sheet. Decorating the top: Melt the green chocolate, add to a piping bag. Cut a small hole and draw
lines across the top of the cakescicle. Add sprinkles immediately - For the wreath make several circles of overlapping lines. Let dry. Add decorations and let dry completely (about 20-30 mins)
- Troubleshooting: If the stick won’t stay inside the dough, remove it from the mold, dip in melted chocolate and insert into pop. Let set for 10-15 mins.
If the chocolate cracks when removing: Peel the chocolate off, if no cake is in the chocolate remelt it and start over. - The sides are not fully covered: Dab a bit of the melted chocolate into the exposed areas and let dry.
- Extra chocolate is on the outer rim: Using a pair of clean scissors carefully trim it off.


Can you be more specific about the content of your article? After reading it, I still have some doubts. Hope you can help me.
Поиск в гугле
Thanks for sharing. I read many of your blog posts, cool, your blog is very good.
This page definitely has all the information I needed concerning this subject and didn’t know who to ask.
Thanks for sharing. I read many of your blog posts, cool, your blog is very good.
I must thank you for the efforts you’ve put in penning this blog. I am hoping to see the same high-grade blog posts by you later on as well. In truth, your creative writing abilities has motivated me to get my own, personal website now 😉
Second, the imposition of capital controls by one country may deflect some capital towards other recipient countries, exacerbating their inflow problem.
I liked your post very much, I will continue to follow you…..
Can you be more specific about the content of your article? After reading it, I still have some doubts. Hope you can help me.